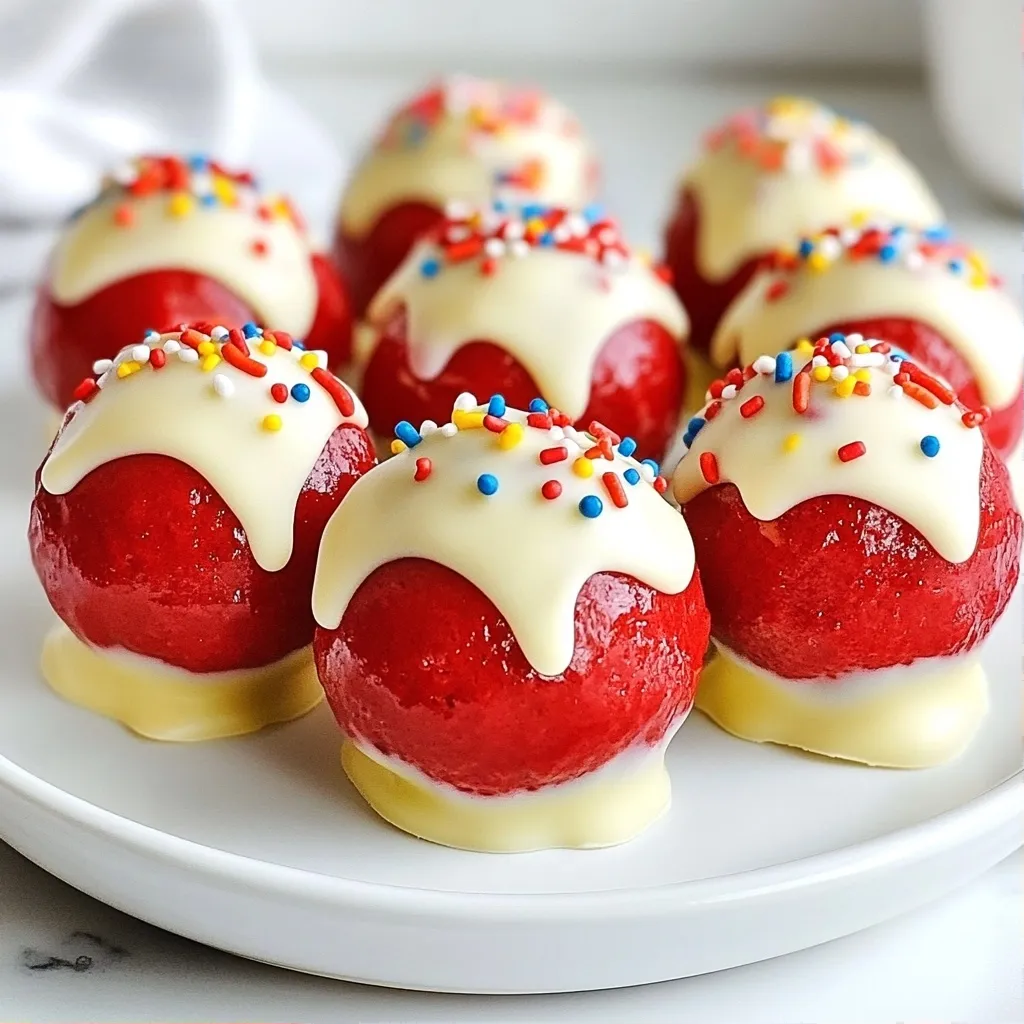
Get ready to indulge in a sweet treat that’s easy and yummy! In this post, I’ll show you how to make decadent air fryer red velvet cake balls. We’ll dive into the ingredients you need, step-by-step instructions, and even some helpful tips. By using an air fryer, you'll get a crispy outside while keeping that rich cake flavor inside. Let's make your dessert dreams come true!
Why I Love This Recipe
- Irresistible Flavor: The combination of rich red velvet cake and creamy frosting creates a delightful burst of flavor in every bite.
- Easy to Make: With just a few simple steps, you can whip up these cake balls in no time, perfect for any occasion.
- Fun Presentation: The colorful sprinkles and glossy white chocolate coating make these cake balls visually appealing and festive.
- Air Fryer Magic: Cooking them in the air fryer gives a unique texture that’s crispy on the outside and soft on the inside.
Ingredients
Red Velvet Cake Crumbs
You need 2 cups of red velvet cake crumbs. This is from one baked red velvet cake. You can bake your cake or use a store-bought one. Crumble it well until you have fine pieces. This will help the cake balls hold together.
Cream Cheese Frosting
For the frosting, use 1 cup of cream cheese frosting. This adds moisture and flavor. You can make it at home or buy it from the store. If you want to make it, mix cream cheese, butter, powdered sugar, and vanilla. This frosting is key to making cake balls creamy and rich.
Melting Ingredients
You will need 1 cup of white chocolate chips and 1 tablespoon of coconut oil. These ingredients create a smooth coating. The coconut oil helps the chocolate melt evenly. Add 1 teaspoon of vanilla extract for extra flavor. This will make your cake balls taste even better!
Step-by-Step Instructions
Preparing the Cake Ball Mixture
To start, gather your ingredients. You need red velvet cake crumbs and cream cheese frosting. In a large bowl, mix them together. Use your hands to combine until it forms a smooth, dough-like ball. This mixture should hold together well. If it feels too dry, add a little more frosting. Once mixed, roll the dough into small balls. Aim for about one inch in size. Place these balls on a tray lined with parchment paper.
Chilling the Cake Balls
Now, it’s time to chill your cake balls. This step helps them firm up. Put the tray in the fridge for about 30 minutes. Chilling makes the balls easier to coat later. You want them to be firm but not frozen. While they chill, you can prepare your white chocolate coating.
Melting the White Chocolate Coating
For the chocolate coating, gather your white chocolate chips and coconut oil. Place them in a microwave-safe bowl. Heat them in the microwave in 20-second bursts. Stir between each burst until it's smooth and melted. Make sure not to overheat the chocolate. It should be shiny and ready for dipping.
Air Frying the Cake Balls
Once your cake balls are chilled and your chocolate is melted, it’s time to dip! Using a fork, dip each cake ball into the melted chocolate. Let any excess chocolate drip off. Place the coated cake balls back on the parchment-lined tray. Before the chocolate sets, add colorful sprinkles on top for decoration.
Now, preheat your air fryer to 320°F (160°C) for about five minutes. After it’s hot, carefully place the cake balls in the basket. Make sure they don’t touch each other. Cook for 5 to 7 minutes. Once done, let them cool slightly before serving. Enjoy your delicious red velvet cake balls!
Tips & Tricks
How to Perfect Cake Ball Consistency
To get the right cake ball texture, mix the crumbs and frosting well. You want a smooth, dough-like mix. If it feels too dry, add a bit more frosting. If it’s too wet, add more cake crumbs. You should easily roll the mix into balls. A good size is about one inch wide. Firm balls hold together better when cooking.
Recommended Air Fryer Settings
Set your air fryer to 320°F (160°C). Preheat it for about five minutes. This helps the cake balls cook evenly. Make sure to space them out in the basket. They should not touch, or they may stick together. Cook them for five to seven minutes. Keep an eye on them to avoid burning.
Decorating with Sprinkles
Sprinkles make your cake balls fun and colorful. After dipping the balls in white chocolate, add sprinkles before the chocolate hardens. This way, the sprinkles will stick well. You can use any type of sprinkles you like. Try mixing colors for a vibrant look. For extra flair, drizzle more melted white chocolate on top once the sprinkles set.
Pro Tips
- Chill for Better Coating: Ensure the cake balls are well-chilled before dipping them in chocolate. This helps the chocolate coating set quickly and prevents the balls from falling apart.
- Quality Chocolate Matters: Use high-quality white chocolate for a smoother and richer coating. This will enhance the overall flavor of your cake balls.
- Experiment with Flavors: Consider adding a dash of almond extract or a splash of peppermint extract to the cream cheese frosting for a unique twist on your cake balls.
- Serving Suggestion: Pair your red velvet cake balls with a scoop of vanilla ice cream or a dollop of whipped cream for an extra indulgent dessert experience.
Variations
Using Different Cake Flavors
You can use any cake flavor to make these cake balls. Chocolate cake, vanilla cake, or even lemon cake can work great. Just replace the red velvet cake crumbs with your desired flavor crumbs. The cream cheese frosting pairs well with all these options. Feel free to get creative!
Alternative Coatings
While white chocolate looks nice, you can try other coatings. Dark chocolate makes a rich, bold flavor. Milk chocolate will give a creamy taste. You can also use colored candy melts for a fun twist. Simply melt them as you did with the white chocolate. The choice is yours!
Adding Fillings
Fillings can make your cake balls even more exciting. Try a dollop of peanut butter or Nutella in the center. You can also use fruit preserves or chocolate ganache. To add a filling, shape the cake mixture around it before rolling into a ball. This surprise inside will delight your guests!
Storage Info
Refrigerating Cake Balls
After making your red velvet cake balls, you can store them in the fridge. Place them in an airtight container. They stay fresh for about 3 to 5 days. Always let them cool first. This keeps their shape and texture.
Freezing Instructions
If you want to save some cake balls for later, freezing is a great option. Arrange the cooled cake balls on a tray. Make sure they do not touch. Freeze them for 1 to 2 hours until firm. Then, transfer them to a freezer bag or container. They can last up to 3 months in the freezer.
Best Storage Methods for Freshness
For the best taste, eat the cake balls fresh. When storing in the fridge, use parchment paper between layers. This prevents sticking. When freezing, label your bags with the date. This helps you track freshness. Always let frozen cake balls thaw in the fridge before enjoying. This keeps them moist and tasty.
FAQs
Can I use store-bought red velvet cake?
Yes, you can use store-bought red velvet cake. It saves time and effort. Just crumble the cake into fine pieces to make the cake crumbs. Mix these crumbs with cream cheese frosting for a tasty treat.
How long do these cake balls last?
These cake balls last about 3-5 days in the fridge. Store them in an airtight container. You can also freeze them for up to 3 months. Just let them thaw in the fridge before enjoying.
Can I make these without an air fryer?
Yes, you can make these in a regular oven. Preheat your oven to 350°F (175°C). Bake the cake balls for about 10-12 minutes. Keep an eye on them to avoid overcooking.
In this blog post, we explored how to make delicious red velvet cake balls. We covered key ingredients, step-by-step instructions, and helpful tips. I also shared fun variations to try and best storage methods to keep your treats fresh. Remember, these cake balls are easy to customize and perfect for any occasion. Enjoy experimenting with flavors and toppings! With the right techniques, you’ll create delightful bites that everyone will love.